Pages

Showing posts with label dairy. Show all posts

7/13/14

Homemade raw goat milk mozzarella


A few weeks ago, we got some dairy goats.
Meet Eunice and Ginger
 The hubby milks them twice a day and we get around 3 quarts of milk per day.

Fresh, raw goat milk is wonderful tasting--nothing like the grocery store goat milk, which I cannot and will not consume-- and much creamier than cow milk since it's naturally homogenized.

Since Little Sister is allergic to most dairy, she has been missing out on some of the finer things in life, as we haven't had access to a consistent source of raw dairy. The greatest sacrifices have been ice cream and pizza. Over the last few years we have occasionally bartered with raw dairy producing friends for an spare lump of mozzarella, but those opportunities are few and far between. Hence the goat acquisition.

Now that we have more milk than we can drink in a week, I have been able to make the wonderful dairy confections my poor little girl has been missing out on all these years. And you won't believe how easy it is to make delicious goat milk mozzarella!*

First, gather your supplies. For mozzarella, the only weird thing you'll need that you may not already have in your pantry is rennet. You can order it online or buy at specialty cheese making shops, which are becoming more and more commonplace these days. It comes in liquid or tablet form. I used the tablets.

 The rest of the items you will need are as follows:
  • 1 gallon goat milk or cow milk (preferably raw, but definitely NOT high-heat pasteurized dairy)
  • 1.5 gallon (non-aluminum) pot with a lid
  • Colander
  • Large bowl to pour the whey into when straining the cheese
  • A long knife to cut the curd
  • Thermometer
  • Measuring cups
  • Citric acid (available in the canning aisle)
  • Slotted spoon
  • Rennet
  • Purified water (not tap water)
  • Microwave safe bowl
  • Rubber gloves
Step 1:
Put 1 1/2 tsp citric acid in the bottom of your pot. Add 1/4 cup purified water. Pour in 1 gallon of milk. Stir with slotted spoon to mix.

Step 2:
Warm milk over medium heat to 90 degrees. Remove from heat. Dissolve 1/4 rennet tablet in 1/4 cup water.
Step 3:
Pour rennet solution into warm milk and stir with slotted spoon in an up and down motion. Put the lid on and set timer for 5 minutes.
Step 4:
Remove lid and check curd. It should be slightly firm, like a custard.
Take your long knife and slice the curd with several cuts going one direction, then several cuts going perpendicular to the first cuts.
 Step 5:
Return curd and whey to heat. Heat to 110 degrees. You can stir the curd gently with your slotted spoon to get it to stick together.
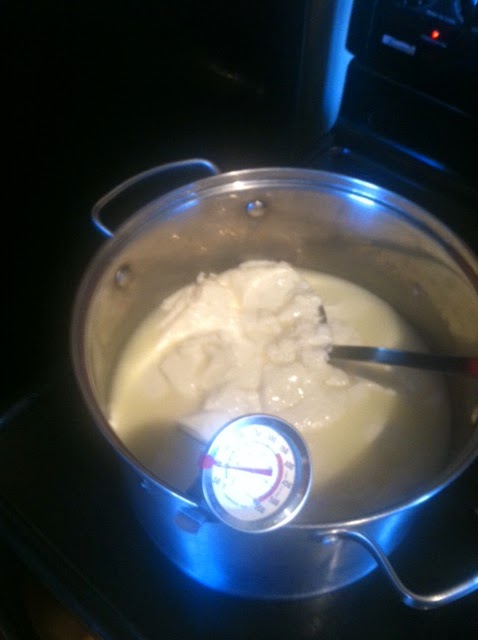
Step 6:
Separate the curds from the whey. You can either spoon the curds into the colander, or you can pour the whole thing in to the colander, but watch for the splash! Roll the curds around in the colander over the bowl of whey to drain as much whey out as you can.
Step 7:
Transfer the curd to a microwave safe bowl. Microwave it for 60 seconds.** 
Put on your rubber gloves. When it comes out of the microwave, pick up the curd and knead and stretch it to release the whey. The whey can squirt out all over, so I do this over the big bowl.

Continue to kneed and squeeze the curd until it starts to stiffen. When the curd tears rather than stretches, put it back in the microwave safe bowl and back in the microwave for 30 more seconds.

Remove, knead and stretch again until the curd stiffens. Put the cheese back in the microwave for 30 more seconds for the third and final time. When it comes out, salt the cheese before kneading. Knead and stretch one last time, and when you've pushed as much whey out as you can,  plunge your cheese into an ice water bath.
 After you're finished making the cheese, store your whey.

The whey is wonderful for all sorts of things. Hubby and the kids love it in smoothies.
 It's also great for lacto-fermented pickles and the Hubby even found a recipe using whey to make a fizzy pro-biotic lemonade. If you don't want to drink it yourself, lots of people feed whey to their animals or use it in the garden to ward off powdery mildew.

After refrigeration, the resulting goat milk mozzarella is as good or better than any mozzarella you can find commercially. It grates well, slices well, and tastes delicious!

 Here's a little appetizer I whipped up with a slice of tomato, a slice of mozzarella, a drizzle of olive oil and a fresh basil leaf. Oh. My. GOODNESS!

A couple of final notes:
* The technique I shared is based on the recipe for mozzarella in Ricki Carroll's book Home Cheese Making, and there are dozens of similar recipes on the internet. Thank goodness for the homesteading pioneers that have made these recipes available for all of us dairy loving novices.
 
** For the anti-microwave purists, you can use a hot water bath to reheat your curd for kneading instead of using the microwave, but it is much harder to get all of the whey out, and your resulting cheese may be soft, more like "fresh mozzarella" which doesn't melt or grate well. When I finally found the microwave process, my cheese became consistently delicious so I highly recommend this technique. 


12/19/12

No Dairy Necessary Hot Cocoa


 A mom's group I attend issued us moms a Christmastime challenge: celebrate each of the 12 (or 10 or 5) days leading up to Christmas by doing something special and unique with the family. I like the idea of creating special seasonal memories for my kiddos so I decided I'd give it a whirl. They gave us a list of more than 40 ideas, some simple and some more elaborate and set us off to work.

The kids loved the idea of a special holiday celebration each day leading up to Christmas, so we put stars next to the ones we liked and have checked them off as we do them. Our top choices included:

  • Set up a nativity set and talk about baby Jesus
  • Make & decorate Christmas cookies
  • Make red & green play dough
  • Have hot chocolate and toast before bed
  • Perform one random act of kindness
  • Listen to Christmas music
  • Dance to Christmas music
  • Watch a Christmas movie
  • Read a Christmas book
  • Drive around at night to see Christmas lights in the neighborhood
We haven't been all that structured about doing one every day, but we have managed check a few off the list in the past several days. Today, we arrived at "Have hot chocolate..." and I had to pause. Making hot cocoa may not sound all that monumental, especially in comparison to whipping up a batch of colored play dough, but Little Sister has a major problem with dairy, so hot cocoa is not something we've ever enjoyed at our house before.

Little Sister's dairy issue is not what would be commonly referred to as "lactose intolerance". It's more like a pre-anaphalactic reaction to the protein structure resulting from the high-heat pasteurization process in most commercially sold milk products...see what I'm saying...nothing to be trifled with. When she was an infant, her entire face would inflate, her eyes swelling to the point that she couldn't see...and that was second hand dairy, if you catch my meaning (yes, I'm talking about breast feeding). The dairy effect is cumulative, in that if she has a tiny amount by accident, she's usually ok. Two tiny amounts, and she starts to get red around the eyes and mouth, three, and well, it's off to the ER. Strangely, she has no reaction to raw, unpasteurized dairy, but we lack the financial resources to spend $13 on a gallon of milk, not including cow shares and dues, so, we just avoid milk all together for Little Sister, and do rice milk or coconut milk instead wherever possible.

In addition to the dairy problem, I'm not all that nuts about hot cocoa, but my darling Boy reminded me that this time of year is not all about me. He was strongly in favor of the "Have hot chocolate and toast" suggestion, so I finally agreed to look in to it.

I started my search in the grocery store where I read the ingredients on several boxes of commercially sold hot chocolate mix. Yuck. In addition to containing milk or milk products, most of them are also loaded with a long list of ingredients that we generally try to stay away from. So I hit the internet. After finding many recipes that made batches for a dozen or more people (do people have hot cocoa parties, or own chalets in the Alps where cocoa is required by law, or what?), I finally came across a recipe for creamy vegan hot cocoa, which appealed both because it used ingredients I readily had on hand, and it made just one cup. By making it in one-cup batches, I could make Little Sister her dairy-free version, and the rest of us could enjoy our creamy dairy filled recipe. I altered it as follows:

No Dairy Necessary Hot Cocoa
3 Tbsp sugar
3 Tbsp rice milk, coconut milk, almond milk, or cow's milk (Why shouldn't I use soy milk?)
4 1/2 tsp unsweetened cocoa
Splash of vanilla extract (I used about 1/4 tsp)
Tiny pinch of salt
1 cup boiling water

Combine sugar, milk, cocoa, vanilla, and salt in a large mug. Pour in boiling water into mug and stir until dry ingredients dissolve. Top with mini marshmallows, and/or whipped cream (for dairy friendly consumers). Ok, I know marshmallows aren't exactly health food, but really, sometimes sacrifices must be made in favor of fun.


To me, hot chocolate is painfully sweet and this recipe is no exception, however, the flavor of this cocoa was wonderful and it was indeed creamy, as advertised. The kids got their fix of chocolate and sugar, and felt like mini-grown ups with their coffee mugs and toast. Overall, the chocolate coated smiles made it worth every minute of the resulting sugar high.