Showing posts with label recipe. Show all posts
8/10/14
Freezing green beans
This spring, I planted a row of bush beans. I had a bunch of old seed, and I wasn't sure how fertile they were, so I dumped all of the seed packets into a bowl and spread the seed melange willy-nilly into the row I'd prepared for them.
As it turned out, most of the seed was still fertile, and grew vigorously in the mild, wet weather we've had this year. Consequently, I've ended up with an unprecedented harvest of green beans overall.
This morning, I went out and picked a 5-gallon bucket full. The beans were so fresh and crisp that they snapped off the plant at the stem, so I didn't even need to snap and string most of them when I got them into the house. I just washed them, snapped them in two pieces and threw them in a colander to prepare them to freeze.
To freeze beans, you must first blanch them in boiling water to stop the enzymes and bacteria in the beans from robbing their flavor, nutrients, and color in the freezer.
1. Heat your water to a full rolling boil. I added a pinch of salt.
2. Fill the colander with green beans and slowly submerge in the boiling water. Set the timer for 3-5 minutes. I set it for 5 since I'm at altitude and my beans were huge.
3. When the timer goes off, immediately remove the colander of beans from the boiling water and place it into another pot or bowl of ice water. This prevents the beans from cooking any longer, which might make them soggy or mushy.
4. Empty the beans onto some towels to dry.
5. Repeat as desired. You can reuse the boiling water up to 4 or 5 times. You will need to add more ice to your ice water bath after each batch.
6. When beans are dry, measure the amount of beans you want per bag and vacuum seal.
Alternatively, you can just fill up a few gallon Ziplock freezer bags and use a handful at a time. Store them in the freezer for up to a year.
My family eats frozen green beans all winter long, and home-grown is so much better than store-bought. But I don't need to tell you that!
Labels:
beans,
freezing,
Garden,
preserving,
recipe,
vegetables
7/13/14
Homemade raw goat milk mozzarella
A few weeks ago, we got some dairy goats.
![]() |
| Meet Eunice and Ginger |
Fresh, raw goat milk is wonderful tasting--nothing like the grocery store goat milk, which I cannot and will not consume-- and much creamier than cow milk since it's naturally homogenized.
Since Little Sister is allergic to most dairy, she has been missing out on some of the finer things in life, as we haven't had access to a consistent source of raw dairy. The greatest sacrifices have been ice cream and pizza. Over the last few years we have occasionally bartered with raw dairy producing friends for an spare lump of mozzarella, but those opportunities are few and far between. Hence the goat acquisition.
Now that we have more milk than we can drink in a week, I have been able to make the wonderful dairy confections my poor little girl has been missing out on all these years. And you won't believe how easy it is to make delicious goat milk mozzarella!*
- 1 gallon goat milk or cow milk (preferably raw, but definitely NOT high-heat pasteurized dairy)
- 1.5 gallon (non-aluminum) pot with a lid
- Colander
- Large bowl to pour the whey into when straining the cheese
- A long knife to cut the curd
- Thermometer
- Measuring cups
- Citric acid (available in the canning aisle)
- Slotted spoon
- Rennet
- Purified water (not tap water)
- Microwave safe bowl
- Rubber gloves
Put 1 1/2 tsp citric acid in the bottom of your pot. Add 1/4 cup purified water. Pour in 1 gallon of milk. Stir with slotted spoon to mix.
Step 2:
Warm milk over medium heat to 90 degrees. Remove from heat. Dissolve 1/4 rennet tablet in 1/4 cup water.
Step 3:
Pour rennet solution into warm milk and stir with slotted spoon in an up and down motion. Put the lid on and set timer for 5 minutes.
Step 4:
Remove lid and check curd. It should be slightly firm, like a custard.
Take your long knife and slice the curd with several cuts going one direction, then several cuts going perpendicular to the first cuts.
Step 5:
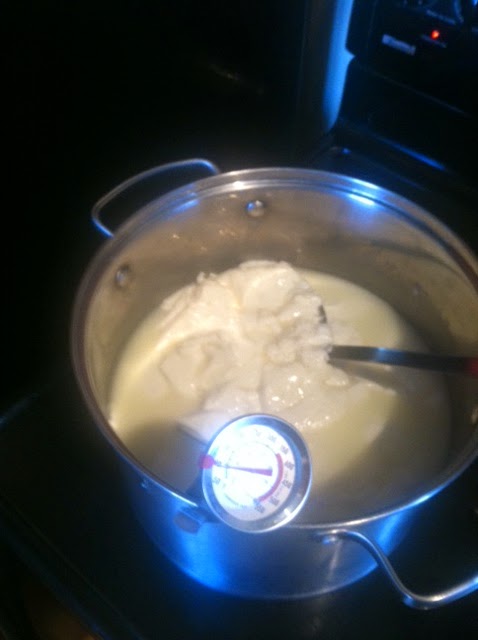
Return curd and whey to heat. Heat to 110 degrees. You can stir the curd gently with your slotted spoon to get it to stick together.
Step 6:
Separate the curds from the whey. You can either spoon the curds into the colander, or you can pour the whole thing in to the colander, but watch for the splash! Roll the curds around in the colander over the bowl of whey to drain as much whey out as you can.
Step 7:
Transfer the curd to a microwave safe bowl. Microwave it for 60 seconds.**
Put on your rubber gloves. When it comes out of the microwave, pick up the curd and knead and stretch it to release the whey. The whey can squirt out all over, so I do this over the big bowl.
Continue to kneed and squeeze the curd until it starts to stiffen. When the curd tears rather than stretches, put it back in the microwave safe bowl and back in the microwave for 30 more seconds.
Remove, knead and stretch again until the curd stiffens. Put the cheese back in the microwave for 30 more seconds for the third and final time. When it comes out, salt the cheese before kneading. Knead and stretch one last time, and when you've pushed as much whey out as you can, plunge your cheese into an ice water bath.
After you're finished making the cheese, store your whey.
The whey is wonderful for all sorts of things. Hubby and the kids love it in smoothies.
It's also great for lacto-fermented pickles and the Hubby even found a recipe using whey to make a fizzy pro-biotic lemonade. If you don't want to drink it yourself, lots of people feed whey to their animals or use it in the garden to ward off powdery mildew.
After refrigeration, the resulting goat milk mozzarella is as good or better than any mozzarella you can find commercially. It grates well, slices well, and tastes delicious!
Here's a little appetizer I whipped up with a slice of tomato, a slice of mozzarella, a drizzle of olive oil and a fresh basil leaf. Oh. My. GOODNESS!
A couple of final notes:
* The technique I shared is based on the recipe for mozzarella in Ricki Carroll's book Home Cheese Making, and there are dozens of similar recipes on the internet. Thank goodness for the homesteading pioneers that have made these recipes available for all of us dairy loving novices.
** For the anti-microwave purists, you can use a hot water bath to reheat your curd for kneading instead of using the microwave, but it is much harder to get all of the whey out, and your resulting cheese may be soft, more like "fresh mozzarella" which doesn't melt or grate well. When I finally found the microwave process, my cheese became consistently delicious so I highly recommend this technique.
11/30/13
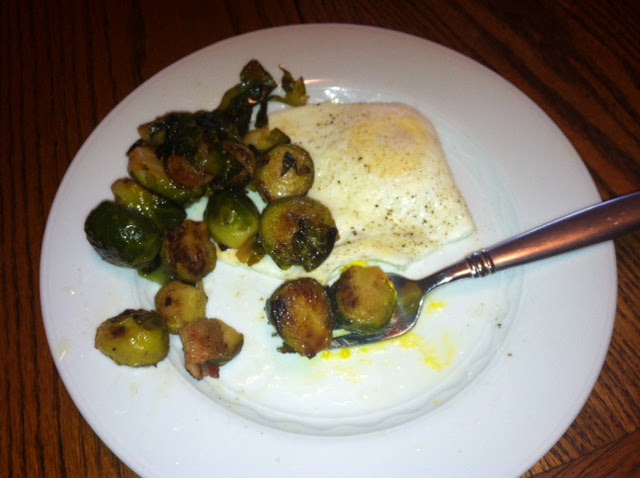
The best Brussels sprouts ever
I know, it sounds crazy. Like most people, I have spent my life repulsed by their reputation, smell, and limp, gray texture. In fact, until a couple of months ago, I had only eaten them twice, and neither time motivated me to want more. But the Hubby's new diet has driven me to search the ends of the earth for vegetable, meat combinations devoid of starches, and it led me to give those tiny little cabbage like morsels another try.
Here's what you do to make the world's best Brussels sprouts.
Pick out some fresh sprouts from your farmers market or grocery store. They should be dense with intact leaves and they should not be brown or limp. Wash them thoroughly.
Trim the stem and slice each sprout in half longitudinally.
Blanche them in boiling water for about 5 minutes. Whatever you do, don't overcook them in this step!! The second they start smelling like Brussels sprouts, pull them out of the boiling water and drain them.
Meanwhile, cut a couple strips of raw bacon into chunks and slice a medium shallot. Plop a pat of butter (a tablespoon or two, don't be shy) into a large skillet over medium-high heat. As the butter melts, drop your shallots and bacon into the pan. Saute briefly before adding Brussels sprouts. Add the sprouts and stir to coat with butter.
Now, here's the key. Flip the little Brussels sprout halves so the flat (cut) side is down. Leave them there until they start to caramelize on the bottom, about 3 or more minutes. Mix again, relocate any stragglers, and let them sit until they also caramelize. Keep going until your whole pan has the nutty, earthy fragrance of caramelized Brussels sprouts and the bacon is slightly crisp.
Here's the ingredient list in case you weren't paying attention:
- About 1 pound fresh Brussels sprouts
- 1-2 Tbsp butter
- 2 strips bacon
- 1 medium shallot
Labels:
dinner,
family,
food,
recipe,
vegetables
11/14/13
Canning applesauce
I was at the local farmers market grocery store and ran across a great deal on apples. Every one of their varieties of apples were just 88 cents per pound. I ran over and asked the produce man to round me up a bushel. APPLESAUCE!!
Last year I canned a few pints of applesauce using our tart apples, and it was really good once I sweetened it sufficiently. This year, our trees failed to produce a single apple so we went without the usual canned apple treats, until I ran across this screaming deal. After reading up on the best apples for sauce, I ended up purchasing about 30 pounds of MacIntosh and 30 pounds of Golden Delicious apples...which I got for around $35.00. The Golden Delicious are sweet enough that you won't have to add sugar at the end, and the MacIntosh adds just a hint of tartness without puckering you up.
Applesauce is the easiest thing in the world to make...if you have the right tools. One of the tools no home should be without is the Victorio food strainer. My aunt bought me mine a few years ago when she found out I was canning (she has an apple orchard in California) and I have used it for so many canning projects since then that I'm not sure how I ever lived without it. With the special screens, you can make perfect, pain-free applesauce, tomato sauce, grape juice, pumpkin puree, and that's just what I've used it for. Countless other options are available.
So here's what I did.
Wash and sort the apples. Little Sister peeled the stickers off for me. We are learning patterns in math so I had her hand me apples in order...yellow, red, yellow, red. . Not exactly scientific, but this way, each pot I put on the stove had the same general apple distribution in it, and it was a great way to reinforce our homeschool lesson!
Cut the apples into quarters, removing the stems.
Put the apples into a large stock pot until full. Add water (or apple juice).
Boil apples for about 10 minutes, or until they are soft.
Spoon them into the Victorio and turn the handle. Presto! Applesauce emerges. Little Sister also helped turn the crank on a few batches, but it's a lot of work for a 5-year-old so she pooped out pretty quickly.
Because I had so many apples, I just kept rotating stockpots full of apples onto the stove. As one was boiling, I ran the previous pot through the Victorio and filled it back up with cut apples, reusing the hot water from the previous batch so it wouldn't take as long to bring the new batch to a boil. I always say that for canning you can't have too many large plastic bowls or large heavy stock pots. I was glad I had several pots for this project, or this simple process could have taken all day!
Once the boiled apples have been turned into hot applesauce, pour the applesauce into a heavy stockpot and keep it warm. Meanwhile, prep and sterilize your jars, and fire up your waterbath canner.
Check consistency of your applesauce. You do NOT need to cook down your applesauce if you make it with the Victorio, as it will come out really thick already. You may, however, need to add some liquid to thin your sauce. I canned my first 6 quarts and they overflowed badly when I pulled them out of the canner, and had all kinds of air bubbles in the jars. Apparently, this is because the sauce is too thick once they lose all of their moisture in processing. So in the other batches, I added a little of the strained cooking water and a bit of all-natural, unsweetened apple juice. To test moisture, look for a thin line of liquid to appear around a spoonful of your sauce, and it should be a soft mound on the spoon. After I made this quick adjustment, my subsequent jars also had a little spillage, but not enough to worry about, and every jar had a nice tight seal.
Taste and season the sauce to your liking. My first batch was au naturel, with no added sweetener or spices. I use this to cook with, or for baby food, or for kids with tummy aches. To the next batch, I added 4 tablespoons of cinnamon, plus a shake of nutmeg and a sprinkle of ground clove. That's it! No added sugar necessary! Delicious!!
Spoon the warm sauce into your hot, sterilized quart jars and process about 25 minutes (at sea level, 30 minutes at altitude). If you get any spillage like I did, make sure you remove the rings after the lid seals and clean the jars with soapy warm water. You don't want mold growing on the top! My ~60 pounds of apples yielded 18 quarts of applesauce, with enough left over to feed the family each a big bowl as an after dinner treat.
Little Sister announced that this was the best cooking project EVER, and the end result was definitely worth the effort. Eighteen jars of the best applesauce you have ever eaten worked out to be about $1.95 per jar. Happy canning!
Last year I canned a few pints of applesauce using our tart apples, and it was really good once I sweetened it sufficiently. This year, our trees failed to produce a single apple so we went without the usual canned apple treats, until I ran across this screaming deal. After reading up on the best apples for sauce, I ended up purchasing about 30 pounds of MacIntosh and 30 pounds of Golden Delicious apples...which I got for around $35.00. The Golden Delicious are sweet enough that you won't have to add sugar at the end, and the MacIntosh adds just a hint of tartness without puckering you up.
Applesauce is the easiest thing in the world to make...if you have the right tools. One of the tools no home should be without is the Victorio food strainer. My aunt bought me mine a few years ago when she found out I was canning (she has an apple orchard in California) and I have used it for so many canning projects since then that I'm not sure how I ever lived without it. With the special screens, you can make perfect, pain-free applesauce, tomato sauce, grape juice, pumpkin puree, and that's just what I've used it for. Countless other options are available.
So here's what I did.
Wash and sort the apples. Little Sister peeled the stickers off for me. We are learning patterns in math so I had her hand me apples in order...yellow, red, yellow, red. . Not exactly scientific, but this way, each pot I put on the stove had the same general apple distribution in it, and it was a great way to reinforce our homeschool lesson!
Cut the apples into quarters, removing the stems.
Put the apples into a large stock pot until full. Add water (or apple juice).
Boil apples for about 10 minutes, or until they are soft.
Spoon them into the Victorio and turn the handle. Presto! Applesauce emerges. Little Sister also helped turn the crank on a few batches, but it's a lot of work for a 5-year-old so she pooped out pretty quickly.
Because I had so many apples, I just kept rotating stockpots full of apples onto the stove. As one was boiling, I ran the previous pot through the Victorio and filled it back up with cut apples, reusing the hot water from the previous batch so it wouldn't take as long to bring the new batch to a boil. I always say that for canning you can't have too many large plastic bowls or large heavy stock pots. I was glad I had several pots for this project, or this simple process could have taken all day!
Once the boiled apples have been turned into hot applesauce, pour the applesauce into a heavy stockpot and keep it warm. Meanwhile, prep and sterilize your jars, and fire up your waterbath canner.
Check consistency of your applesauce. You do NOT need to cook down your applesauce if you make it with the Victorio, as it will come out really thick already. You may, however, need to add some liquid to thin your sauce. I canned my first 6 quarts and they overflowed badly when I pulled them out of the canner, and had all kinds of air bubbles in the jars. Apparently, this is because the sauce is too thick once they lose all of their moisture in processing. So in the other batches, I added a little of the strained cooking water and a bit of all-natural, unsweetened apple juice. To test moisture, look for a thin line of liquid to appear around a spoonful of your sauce, and it should be a soft mound on the spoon. After I made this quick adjustment, my subsequent jars also had a little spillage, but not enough to worry about, and every jar had a nice tight seal.
Taste and season the sauce to your liking. My first batch was au naturel, with no added sweetener or spices. I use this to cook with, or for baby food, or for kids with tummy aches. To the next batch, I added 4 tablespoons of cinnamon, plus a shake of nutmeg and a sprinkle of ground clove. That's it! No added sugar necessary! Delicious!!
Spoon the warm sauce into your hot, sterilized quart jars and process about 25 minutes (at sea level, 30 minutes at altitude). If you get any spillage like I did, make sure you remove the rings after the lid seals and clean the jars with soapy warm water. You don't want mold growing on the top! My ~60 pounds of apples yielded 18 quarts of applesauce, with enough left over to feed the family each a big bowl as an after dinner treat.
Little Sister announced that this was the best cooking project EVER, and the end result was definitely worth the effort. Eighteen jars of the best applesauce you have ever eaten worked out to be about $1.95 per jar. Happy canning!
Labels:
apples,
applesauce,
canning,
food,
fruit,
homeschool,
recipe
12/19/12
No Dairy Necessary Hot Cocoa
A mom's group I attend issued us moms a Christmastime challenge: celebrate each of the 12 (or 10 or 5) days leading up to Christmas by doing something special and unique with the family. I like the idea of creating special seasonal memories for my kiddos so I decided I'd give it a whirl. They gave us a list of more than 40 ideas, some simple and some more elaborate and set us off to work.
The kids loved the idea of a special holiday celebration each day leading up to Christmas, so we put stars next to the ones we liked and have checked them off as we do them. Our top choices included:
- Set up a nativity set and talk about baby Jesus
- Make & decorate Christmas cookies
- Make red & green play dough
- Have hot chocolate and toast before bed
- Perform one random act of kindness
- Listen to Christmas music
- Dance to Christmas music
- Watch a Christmas movie
- Read a Christmas book
- Drive around at night to see Christmas lights in the neighborhood
Little Sister's dairy issue is not what would be commonly referred to as "lactose intolerance". It's more like a pre-anaphalactic reaction to the protein structure resulting from the high-heat pasteurization process in most commercially sold milk products...see what I'm saying...nothing to be trifled with. When she was an infant, her entire face would inflate, her eyes swelling to the point that she couldn't see...and that was second hand dairy, if you catch my meaning (yes, I'm talking about breast feeding). The dairy effect is cumulative, in that if she has a tiny amount by accident, she's usually ok. Two tiny amounts, and she starts to get red around the eyes and mouth, three, and well, it's off to the ER. Strangely, she has no reaction to raw, unpasteurized dairy, but we lack the financial resources to spend $13 on a gallon of milk, not including cow shares and dues, so, we just avoid milk all together for Little Sister, and do rice milk or coconut milk instead wherever possible.
In addition to the dairy problem, I'm not all that nuts about hot cocoa, but my darling Boy reminded me that this time of year is not all about me. He was strongly in favor of the "Have hot chocolate and toast" suggestion, so I finally agreed to look in to it.
I started my search in the grocery store where I read the ingredients on several boxes of commercially sold hot chocolate mix. Yuck. In addition to containing milk or milk products, most of them are also loaded with a long list of ingredients that we generally try to stay away from. So I hit the internet. After finding many recipes that made batches for a dozen or more people (do people have hot cocoa parties, or own chalets in the Alps where cocoa is required by law, or what?), I finally came across a recipe for creamy vegan hot cocoa, which appealed both because it used ingredients I readily had on hand, and it made just one cup. By making it in one-cup batches, I could make Little Sister her dairy-free version, and the rest of us could enjoy our creamy dairy filled recipe. I altered it as follows:
No Dairy Necessary Hot Cocoa
3 Tbsp sugar3 Tbsp rice milk, coconut milk, almond milk, or cow's milk (Why shouldn't I use soy milk?)
4 1/2 tsp unsweetened cocoa
Splash of vanilla extract (I used about 1/4 tsp)
Tiny pinch of salt
1 cup boiling water
Combine sugar, milk, cocoa, vanilla, and salt in a large mug. Pour in boiling water into mug and stir until dry ingredients dissolve. Top with mini marshmallows, and/or whipped cream (for dairy friendly consumers). Ok, I know marshmallows aren't exactly health food, but really, sometimes sacrifices must be made in favor of fun.
To me, hot chocolate is painfully sweet and this recipe is no exception, however, the flavor of this cocoa was wonderful and it was indeed creamy, as advertised. The kids got their fix of chocolate and sugar, and felt like mini-grown ups with their coffee mugs and toast. Overall, the chocolate coated smiles made it worth every minute of the resulting sugar high.
9/1/12
Making elk sausage at home
Breaking news: Hubby harvested a gorgeous, huge, six by seven point, bull elk in the first hour of the first day of the 2012 archery season!
This victory comes after 10 years of going hunting every weekend of archery season and coming home empty handed. It also represents the first bull elk the Hubby has ever taken. No small feat on all counts, but the most exciting part by far is the staggering amount of meat this beast brought our family.
Steaks, roasts, burger, and sausage galore! The hubby does the butchering and I package everything in vacuum seal bags. The grinding and sausage making is a family affair, though. Over the years, I've come across some excellent sausage recipes and I share three of my favorites below, but first a few tips about sausage making.
TIP 1: Keep everything cold, if not frozen for best results. Put grinder implements in the freezer until just before grinding. Keep fat frozen until you grind it and meat so cold it's almost freezing. This keeps fat from emulsifying and smearing through your sausage and preserves perfect consistency.
TIP 2: When filling sausage casings, fill one whole casing at a time. Wait to twist individual links until after the whole casing is filled.
TIP 3: Dry links before cutting and vacuum sealing. I hang my connected links over the laundry rack for an hour or two before cutting the links apart and sealing them. (If you do use a laundry rack, just don't forget to leave the dog outside, as sausages hanging at canine eye level are tempting fare indeed)
This is a delicious sausage I package in bulk for biscuits and gravy or sausage patties with breakfast. It's also amazing in egg casserole recipes that call for sausage.
Last year was the first year I tried this one, and it was an absolute favorite. Brilliant on the grill or in recipes, I'm making this one in lieu of Italian sausage this year. I've given you my modified version, but you can find the original recipe here.
For more flavor, I used a dark beer for the brats. We all enjoy them throughout the year on a crusty bun with sauerkraut and spicy mustard.
This victory comes after 10 years of going hunting every weekend of archery season and coming home empty handed. It also represents the first bull elk the Hubby has ever taken. No small feat on all counts, but the most exciting part by far is the staggering amount of meat this beast brought our family.
Steaks, roasts, burger, and sausage galore! The hubby does the butchering and I package everything in vacuum seal bags. The grinding and sausage making is a family affair, though. Over the years, I've come across some excellent sausage recipes and I share three of my favorites below, but first a few tips about sausage making.
TIP 1: Keep everything cold, if not frozen for best results. Put grinder implements in the freezer until just before grinding. Keep fat frozen until you grind it and meat so cold it's almost freezing. This keeps fat from emulsifying and smearing through your sausage and preserves perfect consistency.
TIP 2: When filling sausage casings, fill one whole casing at a time. Wait to twist individual links until after the whole casing is filled.
* * * * * * ** * * * * * *
Recipes
* * * * * * * * * * * * * *
1. Bulk Breakfast Sausage:This is a delicious sausage I package in bulk for biscuits and gravy or sausage patties with breakfast. It's also amazing in egg casserole recipes that call for sausage.
- 10 pounds game meat
- 5 pounds pork fat
- 2 1/2 Tbsp sea salt
- 2 1/2 Tbsp fresh ground coarse black pepper
- 1/2 tsp nutmeg
- 1/2 tsp clove
- 1 tsp allspice
- 1 1/2 tsp garlic powder
- 4 Tbsp rubbed sage
- 1 1/2 ground ginger
* * * * * * * * * * * * * * * * *
2. Bobby Flay's Elk Sausage:Last year was the first year I tried this one, and it was an absolute favorite. Brilliant on the grill or in recipes, I'm making this one in lieu of Italian sausage this year. I've given you my modified version, but you can find the original recipe here.
- 10 pounds elk meat (or other game meat)
- 5 pounds pork fat
- 2 Tbsp dry thyme
- 2 Tbsp dry oregano
- 2 Tbsp dry sage
- 1/4 cup salt
- 2 cups finely chopped onion
- 1 cup or more finely chopped garlic
- 1/2 cup crushed red chili pepper flakes
- 10 to 15 feet sausage casing
* * * * * * * * * * * * * * * * *
3. Bratwurst:For more flavor, I used a dark beer for the brats. We all enjoy them throughout the year on a crusty bun with sauerkraut and spicy mustard.
- 10 pounds game meat
- 5 pounds pork fat
- 6 Tbsp salt
- 2 Tbsp sugar
- 3 tsp nutmeg
- 1 tsp coriander
- 3/4 tsp celery seed
- 4 tsp black pepper
- 1/2 tsp marjoram
- 3 tsp ground ginger
- 1 cup beer
6/2/12
Turtle nuggets
Until recently, when someone told me we'd be eating turtle, I instantly imagined a lovely dessert with chocolate, caramel and pecans. Then the Hubby found a snapping turtle on the road and decided he wanted to eat it. "T.E.O.T.W.A.W.K.I. Turtle" is what he calls it. (For those of you not up on "prepper" jargon, that long acronym stands for The End Of The World As We Know It.) Ok, ok, redneck jokes aside, I rolled my eyes and tried to get in to the idea of consuming reptile.
My only reptilian culinary experience was with alligator fritters, which I found tender and delicious. They were lightly battered, had consistency like fish, but were decidedly more chicken-like in flavor. I was cautiously optimistic that snapping turtle might lend itself to the same mild flavor.
As we got closer to the day when we would actually prepare the turtle, while the kids were huddled around the stock tank admiring it resting benignly beneath the water, I began to lose my nerve about dispatching the thing. It seemed harmless enough, after all. But then the Hubby enlightened me to the well publicized fact that snapping turtles are responsible for maiming cattle every year, as they bite off the teats of wading cows. Well, that did it. With new resolve, I gave the nod and the Hubby began his quest to find a decent way to prepare our new game meat.
Hubby scoured the internet for info on killing, cleaning, and cooking snapping turtle. Thankfully, the southern part of the U.S. is loaded with the things (imagine herds of udderless cows with hungry, frustrated calves) and there are no shortage of hillbillies with video cameras ready to impart their wisdom on YouTube.
First you need a good "whomping stick". You don't actually kill the turtle with the stick, you just "whomp" it in the nose like you're driving a golf ball down the fairway, and then run up to its head while the turtle is seeing stars and decapitate it before it wakes up and takes off your hand.
Once head and turtle are separated, you need a cutting board with a nail protruding from it, sharp side up. That's for sticking the turtle parts on so they don't crawl away while you're slicing the meat off of them. Oh, yeah. Reptile muscles require no connection with a nervous system to continue to operate. That's why snake heads can still bite you after they've been removed from the body. I didn't quite anticipate the impact this uniquely reptilian adaptation would have on me. I usually have a pretty strong stomach for butchering and processing game, but something about limbs recoiling as they're being severed turned even my stomach. I couldn't watch, so there are not many pictures of the processing part.
Once the meat was in the bowl, it could have been mistaken for pork, if it weren't for the fact that the pieces were still twitching. All the pieces went into a soup pot filled with water and were boiled for about 2 hours.
We drained the meat, and Hubby created a batter. As usual, he used every spice in the cabinet so I have no idea how to tell you to reproduce it. Sorry. I did observe him dipping the pieces in egg batter, then rolling them in his seasoned flour, breadcrumb mixture.
Then, we pan fried the nuggets.
Amazingly, the nuggets were delicious. They were decidedly more dense than alligator, with more of a pork-like consistency, and no fishiness. The kids loved it so much they wanted more turtle nuggets for dessert, begging in sing song "we want turtle, we want turtle". And to think we have friends whose kids will only eat peanut butter and jelly.
While I'm fairly certain a chain of Turtle-Fil-A restaurants will not spring up across the U.S., I can confidently state that snapping turtle is indelibly inked onto a growing list of T.E.O.T.W.A.W.K.I. menu items. Who knows, I may even eat it again in a non-starvation survival scenario.
My only reptilian culinary experience was with alligator fritters, which I found tender and delicious. They were lightly battered, had consistency like fish, but were decidedly more chicken-like in flavor. I was cautiously optimistic that snapping turtle might lend itself to the same mild flavor.
As we got closer to the day when we would actually prepare the turtle, while the kids were huddled around the stock tank admiring it resting benignly beneath the water, I began to lose my nerve about dispatching the thing. It seemed harmless enough, after all. But then the Hubby enlightened me to the well publicized fact that snapping turtles are responsible for maiming cattle every year, as they bite off the teats of wading cows. Well, that did it. With new resolve, I gave the nod and the Hubby began his quest to find a decent way to prepare our new game meat.
Hubby scoured the internet for info on killing, cleaning, and cooking snapping turtle. Thankfully, the southern part of the U.S. is loaded with the things (imagine herds of udderless cows with hungry, frustrated calves) and there are no shortage of hillbillies with video cameras ready to impart their wisdom on YouTube.
First you need a good "whomping stick". You don't actually kill the turtle with the stick, you just "whomp" it in the nose like you're driving a golf ball down the fairway, and then run up to its head while the turtle is seeing stars and decapitate it before it wakes up and takes off your hand.
Once head and turtle are separated, you need a cutting board with a nail protruding from it, sharp side up. That's for sticking the turtle parts on so they don't crawl away while you're slicing the meat off of them. Oh, yeah. Reptile muscles require no connection with a nervous system to continue to operate. That's why snake heads can still bite you after they've been removed from the body. I didn't quite anticipate the impact this uniquely reptilian adaptation would have on me. I usually have a pretty strong stomach for butchering and processing game, but something about limbs recoiling as they're being severed turned even my stomach. I couldn't watch, so there are not many pictures of the processing part.
![]() |
| Big biting muscles mean there is lots of good meat on the head. |
Once the meat was in the bowl, it could have been mistaken for pork, if it weren't for the fact that the pieces were still twitching. All the pieces went into a soup pot filled with water and were boiled for about 2 hours.
We drained the meat, and Hubby created a batter. As usual, he used every spice in the cabinet so I have no idea how to tell you to reproduce it. Sorry. I did observe him dipping the pieces in egg batter, then rolling them in his seasoned flour, breadcrumb mixture.
Then, we pan fried the nuggets.
Amazingly, the nuggets were delicious. They were decidedly more dense than alligator, with more of a pork-like consistency, and no fishiness. The kids loved it so much they wanted more turtle nuggets for dessert, begging in sing song "we want turtle, we want turtle". And to think we have friends whose kids will only eat peanut butter and jelly.
While I'm fairly certain a chain of Turtle-Fil-A restaurants will not spring up across the U.S., I can confidently state that snapping turtle is indelibly inked onto a growing list of T.E.O.T.W.A.W.K.I. menu items. Who knows, I may even eat it again in a non-starvation survival scenario.
9/4/11
Dove hunting and its delicious result
September first is a bona fide holiday in our family. For generations, my hubby's family members have taken the day off of work and freed their kids from school to celebrate the opening day of mourning dove season.
When I first met the hubby (then boyfriend) I began joining him on this sacred holiday, and I have since learned to love dove openers. Unlike the wintertime water foul seasons, it's typically warm enough on September 1st to wear shorts. You pack a lunch, some water, and many, many boxes of shotgun shells and, if you're lucky, you come home with fewer than a dozen doves. If you're me, you come home with one bird...ok, so shotgunning fast-moving airborne game birds is not my strong suit. But my lack of success dove hunting doesn't keep me from going.
This year, we packed both of the kids, who were eager to participate in this family tradition. Though Little Sister is still too young and excitable to handle even a toy gun, Boy has demonstrated extremely disciplined gun handling skills with his toy guns and, as a result, was given his first shotgun for his 5th birthday.
This isn't any shotgun either. This JC Higgins 410 single-shot was his daddy's first shotgun, and his granddaddy's first shotgun as well. While Boy is still a bit too small to handle it by himself, he did get a chance to fire a round in the direction of a dove...with no success, but at least he was in good company. It was a fun morning, and the kids both came home dirty and tired, and we had a collective count of about 10 birds to show for our efforts.
The Hubby went out for the afternoon shoot, sans wife and kids, and came home with about 20 more. Out here, while there is a 15 bird limit on our native mourning dove, the larger, non-native Eurasian collared dove has begun to dominate the habitat and resources of the mourning dove, and is therefore considered a nuisance species. There is no limit on collared dove.
So what do you do with 30 or so dove? I typically make a fun little appetizer called Dove Poppers which is a half dove breast marinated in Chipotle Tobasco sauce atop a cream cheese stuffed half jalapeno, wrapped with bacon and then baked, but this year, due to the volume of little dove breasts in the fridge, the Hubby suggested a dove jambalaya...ooooh, I love it when he talks food.
So we began looking into recipes and managed to adapt a few to meet our needs. I was extremely disappointed with the store-bought Cajun seasoning options, so the Hubby found a great recipe for it as well and I included it here too, but feel free to use a store-bought one you like if you'd rather. The jambalaya was a huge success, and we both agreed it was our new favorite recipe for dove! It made a huge pot, and was perfect for a group, and the dove meat was fork tender, moist and delicious. Even people who turn their noses up at game meat would be hard pressed to find flaw with this recipe, so without further ado, here it is.
Dove Jambalaya
-
6 slices thick cut bacon, cut into1-inch pieces
- 1 pound cooked ham, diced
- 2 pounds boneless dove breasts
- 1 package cooked andouille sausage
- 3 T butter
- 2 cups chopped celery
- 2 cups bell pepper, seeded and chopped
- 1 large onion, chopped
- 2 cloves garlic, minced
- 4 (14.5 ounce) cans diced tomatoes, with liquid
- 4 cups beef broth
- 4 cups chicken broth
- 6 T. Cajun seasoning (recipe below) divided
- 3 cups uncooked white rice
- Sprinkle 3-4 T of Cajun seasoning over dove breasts and toss to coat.
- In a large stockpot, cook bacon over medium heat until crisp. Remove bacon with a slotted spoon and set aside.
- Add dove breasts to pot and brown in batches in bacon grease. Return browned meat and bacon to pan and add diced ham and sliced sausage. Set aside.
- In a separate pan, heat butter over medium heat. Add celery, pepper, onion and garlic and saute until soft.
- Add veggies to meat in stock pot, along with tomatoes, broth and 2 T. Cajun seasoning. Bring to a boil, then reduce heat and simmer approximately 2 hours.
- Stir in rice and cover, setting timer for 20 minutes. Stir occasionally to keep rice from sticking to bottom of pot.
- Remove pot from heat and let set 10 minutes before serving.
Cajun Seasoning
- 5 T. paprika
- 2 T. fresh ground black pepper
- 1 T. onion powder
- 1 T. garlic powder
- 1 T. dried oregano
- 1 T. dried basil
- 1 T dried thyme
- 1 T. salt
- 1 tsp. white pepper
- 1 tsp. cayenne pepper (or to taste)
- 1 tsp. ground coriander
Subscribe to:
Posts (Atom)